Many households, especially those faced with a relocation, have boxes of content that they would like to track and be able to see what is in the box at a later time by scanning a QR code label affixed to the outside of the box.
This "app" is a collection of web pages and scripts intended to be used with an HTML5-enabled device and a camera. Ideally, the device is a modern smartphone that also includes the camera, but this is not a strict requirement. It is possible to use the scripts from a conventional desktop along with photos taken by a dedicated digital camera.
No actual "app" is loaded on the phone as the user interface is implemented entirely by HTML5 web pages that just need to be browsed. The bulk of the logic and persistent storage is implemented by scripts that run on the web server.
The box inventory "app" is implemented as a small collection of Common Gateway Interface (described in RFC 3875) scripts and a couple of HTML web pages. Persistent data is stored in two tab-separated text files and individual image files. These formats are readily stored in a "real" database if the need or desire arises.
The CGI scripts and their auxillary programs will typically be installed under the web server's cgi‑bin directory. The scripts are not normally directly accessed but instead invoked in the context of a POST or GET request submitted to the web server.
Unfortunately, CGI scripts do not behave well with some of the modern Apache HTTP Multi-Processing Module configurations. The traditional prefork module does yield acceptable results. On a modern Fedora system, this entails updating /etc/httpd/conf.module.d/00-mpm.conf to uncomment the LoadModule for the prefork module:
LoadModule mpm_prefork_module modules/mod_mpm_prefork.soand comment out the original usage of the event module:
#LoadModule mpm_event_module modules/mod_mpm_event.so
The default configuration of many web servers has a root directory under which an html and cgi‑bin directory are maintained. If the local web server has this structure, then the contents of the tar archive can be extracted directly; otherwise, the contents should be extracted to a temporary directory and the contents moved to their respective final locations. Without loss of generality, assume the root of the web server directory is /var/www. If the local setup has the html and cgi‑bin directories, then the installation can be done simply by:
# cd /var/www
# tar xvf ..../boxInventoryTools.tar
# Absolute path to root of web server's exposed web pages
WWW_ROOT_DIR="/var/www/html"
BOX_DB_DIR="/var/www/boxData"

# Directory into which imagery of box contents will be stored.
# Needs to be retrieveable from the web server, so under WWW_ROOT_DIR
BOX_IMAGES_DIR="${WWW_ROOT_DIR}/inventoryImages"

# log into which box description data is collected, saved as tab-separated data
BOX_LISTING_TSV="${BOX_DB_DIR}/boxDescription.tsv"

# tab-separated list mapping box ids to photos
BOX_IMAGES_TSV="${BOX_DB_DIR}/boxImages.tsv"
The variables defined are:
The CGI scripts, often installed in /var/www/cgi‑bin, are described below:
There are two natural starting points from which to start using the box inventory tools: browsing /describeBox.html or /cgi‑bin/listBoxes. For simplicity, /cgi‑bin/listBoxes is recommended for use as a bookmark as it provides a link to /describeBox.html at the top of its generated page.
| BoxId | BoxSize | Weight | ContentType | Description |
|---|---|---|---|---|
| JPTEA | 16x12x12 | Heavy | Ceramics | Japanese tea sets and vases |
| STFDANML | 18x18x16 | Light | Stuffed animals | Childhood stuffed animals as well as modern ones. |
| Models-1 | 16x12x12 | Light | Models | Airplane, Gundam and train models. |
| Models-2 | 16x12x12 | Light | Models | Star Wars and Ultraman ship models |
| Wii | 16x12x12 | Heavy | Nintendo Wii | Nintendo Wii, game discs and accessories. |
| Xbox360 | 16x12x12 | VeryHeavy | Xbox 360 | Xbox 360 console, Kinect and video games. |
| Drums1 | 16x12x12 | VeryHeavy | Roland TD-9 | Roland TD-9 module, drum pads and cymbals, hi-hat pedal. |
| Drums-2 | 18x18x16 | VeryHeavy | Drum parts | Drum bass pad, drum throne, drums sticks. |
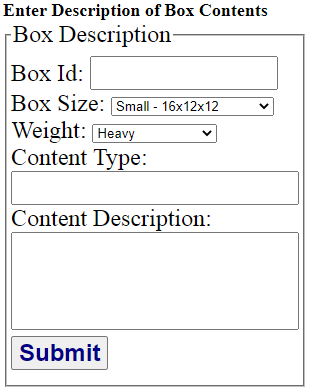
On the user's phone, browsing /describeBox.html yields a page that appears similar to:
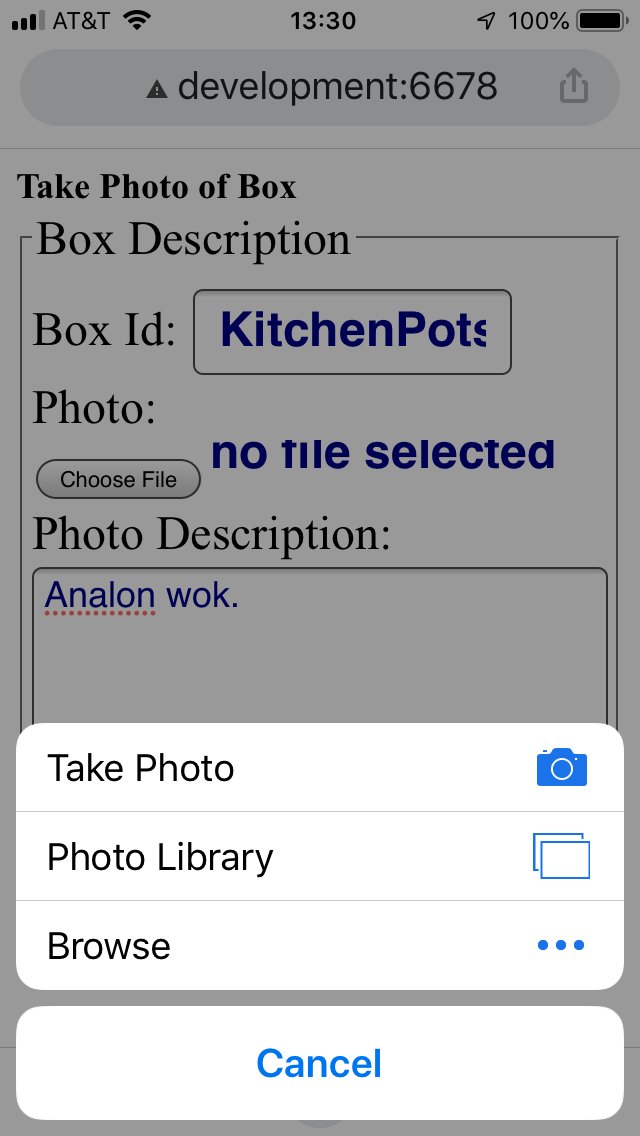
After filling in the contents, the /scannerForm.html page is repeatedly displayed, allowing as many images as desired to be acquired and uploaded. The display appears similar to the image below when one presses the "Choose File" button. To their great credit, most mobile browsers provide a "Take Photo" option that permits an image to be acquired and uploaded without requiring it to be stored locally first. This capability is enabled even over unencrypted HTTP connections, so the user does not need to enable HTTPS by creating and deploying the private key and certificate.
After taking the photo and filling in a description of the image, the screen will look similar to:
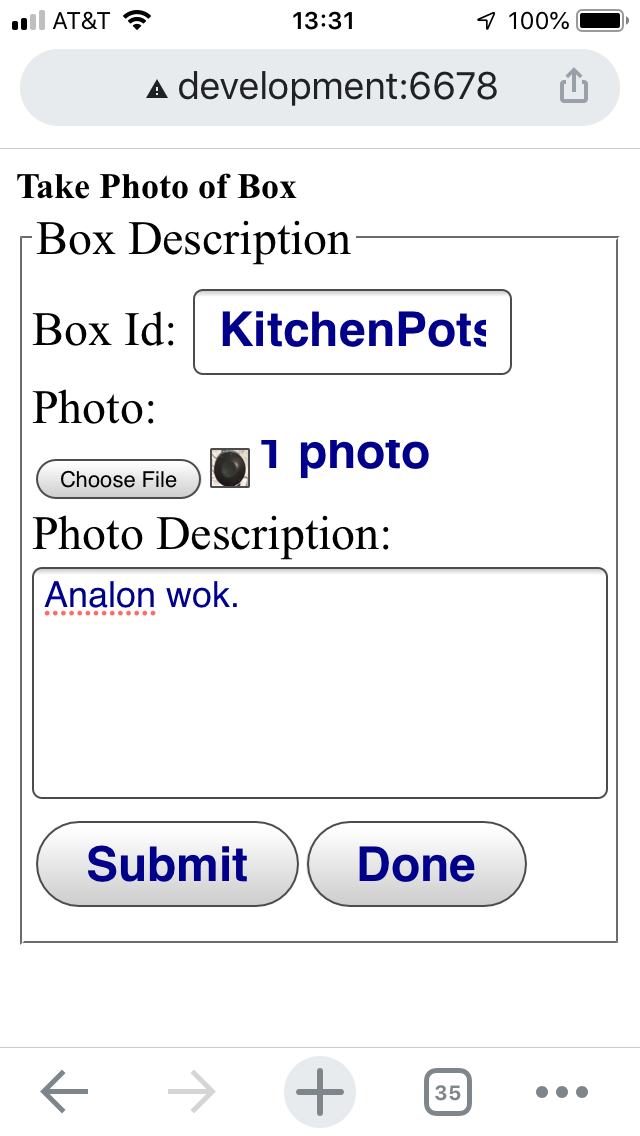
Pressing the "Submit" button will upload the image data and descriptive text. After the request is processed, the page should be redisplayed so that additional pictures can be taken of the box contents. Pressing the "Done" button will return back to the describeBox.html page to permit a new box to be described.
The annotateBoxData script can be used to extend the data maintained in the boxData/boxDescription.tsv file with additional columns that can be exploited by the mail-merge option of the glabels application to programmatically color fields or provide alternative text. An example label appears below:

One of the generated columns is the URL to be used in QR codes. The ‑‑host option can be used to specify the initial portion of the URL, namely http or https, the host name and optional port. The appropriate choice requires some thought because the QR codes affixed to the outside of boxes cannot be changed; one wants a URL that will be valid for a decade or more.
If one wants to be able to use their cellphone to scan QR codes on boxes located within a remote storage facility (rather than simply areas within the reach of one's WiFi network, such as a basement or attic), the host name will need to be resolvable on the public Internet and requests forwarded appropriately to the HTTP server. For home users, this normally involves ownership of a domain name, keeping the DNS record up-to-date over the years and potentially enabling port-forwarding on a router so that requests from the public Internet are forwarded to the HTTP server. Alternatively, the user may operate a virtual private network, which shifts the burden of establishing connectivity from the public Internet to the VPN service configuration.
The html/inventoryImages/fixRotation script can be used to rotate images so they are displayed as originally taken. Many cameras encode a rotation factor in the image meta data that indicates how the camera was oriented with respect to the ground and this needs to be taken into account if the image is to be displayed as intended. Unfortunately, some browsers do not honor this meta data. The fixRotation script identifies images that have an embedded orientation indicator and generates rotated images as needed.
A QR code for a box can be generated by makeQRcodeForBox. This will create a QR code that invokes displayInventory for the designated box.
usage: makeQRcodeForBox [{--http | --https}] [--host webhost] [--cgi template] [-t outputType] [-o outputFile] boxId
    Default proto is "http"
    Default host is "localHostname"
    Default CGI template is "cgi-bin/displayInventory?boxId=%s"
    Default output type is "utf8"
    Use "utf8" to output graphic "text" image that can be seen on a terminal.
    Default output destination is to standard out